Calomax Quantum User Manual
Browse online or download User Manual for Water heaters & boilers Calomax Quantum. QUANTUM -E ISSUE 4.indd
- Page / 24
- Table of contents
- BOOKMARKS
- Lupton Avenue, Leeds LS9 7DD 1
- (Incorporating On/Off switch) 1
- CONTENTS 2
- INTRODUCTION 3
- CHECK LIST 3
- APPROVALS 3
- INSTALLATION 4
- USER INSTRUCTIONS 6
- e Energy saving system 7
- GENERAL NOTES 8
- GENERAL OPERATION 8
- CLEANING 8
- Accessories 9
- Plug-in time switch 10
- Fused spur time switch 10
- SERVICE INSTRUCTIONS 11
- (Body cut away to show 12
- Outer Casing removed 12
- 9 10 11 12 16
- 16151413 16
- NB: Not to scale 17
- SINGLE POLE 18
- ISOLATING 18
- BASIC TROUBLE SHOOTING 19
Summary of Contents
INSTALLATION, OPERATION AND SERVICING INSTRUCTIONSCalomax LimitedLupton Avenue, Leeds LS9 7DDTel. 0113 249 6681 Fax. 0113 235 0358e-mail: service@calo
Page 10Plug-in time switchRef. 7DPITMax 3kWFor more information visit our website at www.calomax.co.uk or call 0113 249 6681Fused spur time switchRef.
Page 11If the unit requires servicing the service indicator will flash a sequence of light pulses . A 2x or 3x-light pulse generally indicates that t
Page 1212235678910111214151617If parts required are not identified,please contact Calomax LimitedIncludes nuts, washers, etc.Exploded parts view for Q
Page 1312235678910111214151617If parts required are not identified,please contact Calomax LimitedIncludes nuts, washers, etc.Exploded parts view for Q
Page 14which must be fitted the correct way round. The lid is labelled accordingly. To remove the lid, break the lid gasket seal and pull the lid forw
Page 15sensors. The PCB also controls the external light unit to indicate the current state of the boiler. Red and yellow LED’S on the circuit board i
Page 16SPARE PARTS (Refer to centre pages for location).NB: Not to scale.QDVMMK QKMEPBK QEAPCBTQPCBTDPBKNB15BLGCASSVTAKENBE3HKWIH (1m) CASMR QLPK NBPR
Page 17Spare parts are usually available ex-stock. Please quote Model & Serial Number. NB: Not to scale.QUFKUPPER FASCIA KIT17LOWER FASCIA KIT18S
Page 18Wiring Schematic for Calomax Quantum'e' Water BoilerREDYELLOWPINKBROWNORANGEWHITE+12Vdc (BROWN)BLACKRED0.75mm YELLOW0.75 white or 0.5
Page 19BASIC TROUBLE SHOOTING Symptoms Possible Cause RemedyNo boiling water availableSelected operating level sensor holding a signalThermal cut-out
Page 2CONTENTS INTRODUCTION 3CHECK LIST 3APPROVALS 3CONSTRUCTION 4INSTALLATION 4LOCATION
Page 20MAINTENANCE AND SERVICE HISTORY
Page 21MAINTENANCE AND SERVICE HISTORY
Page 22MAINTENANCE AND SERVICE HISTORY
Page 23Calomax have manufactured water boilers in the UK for over 50 years. We are proud of our products and the back-up service we provideProperly m
Page 24Model QUANTUM-eSerial NumberDraw off Capacity 9 Litres (5 in energy saving mode)Heat-up Time (first switch-on) 9 Litre c
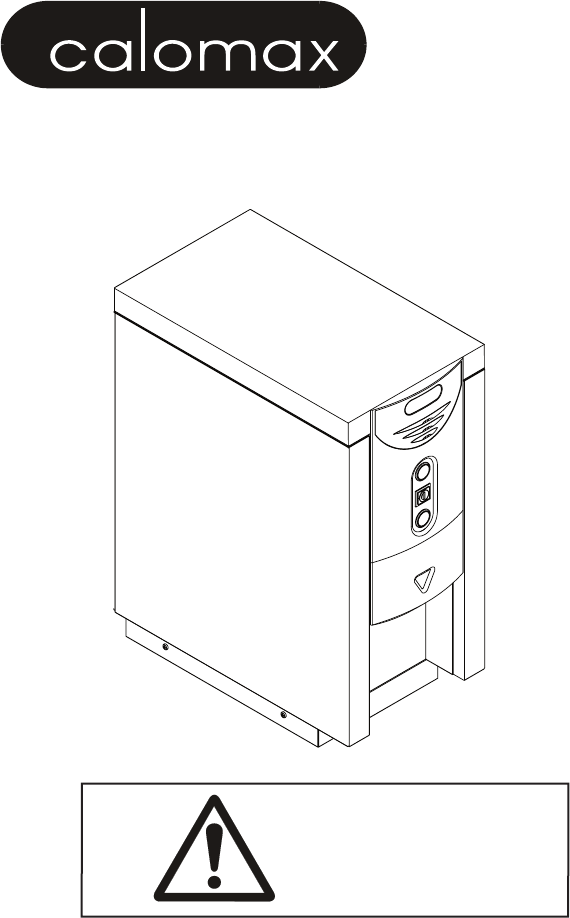
Page 3INTRODUCTIONThank you for purchasing a Calomax Quantum-e boiler. All our products are designed to give years of simple, reliable operation. To e
Page 4LOCATIONTo comply with recommendations from the health and safety executive it is important that due consideration be given to safe operation of
Page 5COLD WATER INLETTo comply with the U.K. Water Supply Regulation a single check-valve must be fitted to the supply. BEFORE CONNECTING, THE SUPPLY
Page 6ELECTRICAL CONNECTIONSThe boiler is supplied with a fitted plug and lead and should be plugged into a 240v 13A electrical socket, capable of ca
Page 7On subsequent operation of the boilerThe boiler will fill and heat in cycles. It will allow only a limited amount of water to enter the unit at
Page 8• hold a cup below the dispense valve or place large vessels on the drip tray. Care must be taken to avoid injury through splashing or over-fil
Page 9AccessoriesWorktop-mounting StainlessSteel drip trayRef. HSSDTK(freestanding)Boiler securing clamp(To fix boiler to a worktop)Ref. QECIngredient
More documents for Water heaters & boilers Calomax Quantum

Related products and manuals for Water heaters & boilers Calomax Quantum
 (9 pages)
© 2020, manymanuals.com. All rights reserved. | 2.050 s |
 Manymanuals.com
 Manymanuals.de
 Manymanuals.fr
 Manymanuals.it
 Manymanuals.pl
 Manymanuals.cz
 Manymanuals.es
 Manymanuals-pt.com
Comments to this Manuals